How to Over-Engineer Home Automation (Or Also Called Not-Invented-Here Syndrome)

This blog post is about our new home automation infrastructure with a Raspberry PI 4b, quite some C++ code, a grpc based protocol and a nice android application. But to get to the end I first have to start with explaining why we had to implemented our own solution (besides the disinterest in looking into pre-existing solutions).
A couple of years ago I was tasked with replacing the system to control the window blinds in my parents home. The system was over a decade old and based on an ancient micro-controller, which had to be programmed in some dialect of BASIC.
Since there were no replacement parts and the solution already partially breaking down (one led display wouldn’t work anymore,) I had to find a relatively quick solution. I took an original Raspberry PI 1b with 256MiB of memory out of an old drawer and wrote a simple C++ application offering a web service to control some GPIOs. This worked quite well, although I had to cross-compile the code, since the SBC was simply to weak to compile the libraries I wanted to use.
As a client application I wrote a simple Qml/C++ application. It was rather simple and only consisted of a single page with enough buttons to control all functionality.
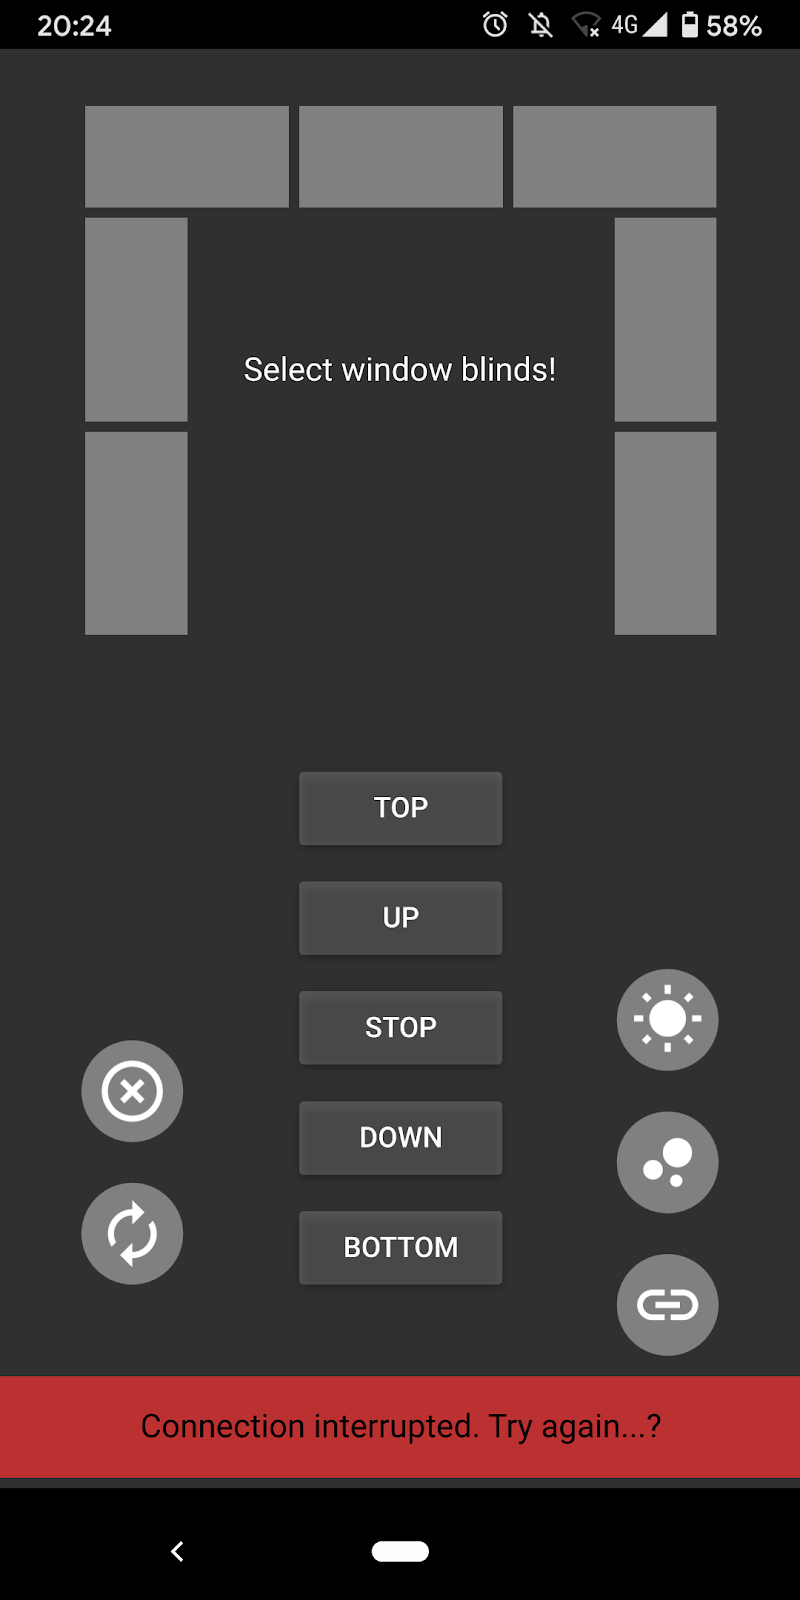
It did not look special, but ran more or less effortlessly on Linux, Windows, Android and Windows Phone. I also made it run on an iOS tablet, but due to Apple only allowing developers to sign their app for a single week (unless they pay 100$/year) this was not something that ended up being used.
Fast forward to 2019
The system still worked (it had been in use for 2-3 years) but I wanted a cleaner solution and the Raspberry PI 1 was too slow in order to run any additional applications. Meaning I rewrote the whole project, upgraded to a Raspberry PI 4 and wrote a new mobile app for Android as well.
Part 1: The Server-Application and the Raspberry PI
Although I initially started with a Raspberry PI 3b and Fedora Minimal, I quickly upgraded to a Raspberry PI 4b due to its superior IO performance. Unfortunately that also meant I couldn’t use Fedora anymore since it does not yet support the newer RPI4b. Luckily Canonical was quicker and provides support with their 19.10 release (which includes an arm64 version).
Anyway: since the newest RPI has enough power to run multiple services, I wanted to run at least the following things on it:
- Wireguard VPN Server
- Dynamic DNS Script
- External SSD accessible by SFTP/SMB
- The actual home automation application
Raspberry PI 4b Installation
Just follow the official Ubuntu guide and it will work mostly fine. I only encountered some initial stability and temperature issues. The temperature issues have been resolved by installing a passive armor case. It has the advantage of the good passive cooling while all gpio ports are still easily accessible. Just be careful to buy the correct case for your raspberry pi, there are multiple versions for different generations of the RPI available. There also seem to be some RPI4b versions which do not cool the USB controller. The one I bought is from amazon and a brand called geekworm.
The usb stability issues have been resolved with an upgrade of the VLI firmware (usb controller from VIA). This at the same time also adds power management for the chip, which has helped to improve the temperatures.
VPN-Server
Access to the local network was something I wanted to have a long time ago, but existing vpn protocols were a bit of a pain to to set up. In 2018 Arstechnica did an article about wireguard, a new vpn protocol that should resolve this. Supposedly it is easy to configure, has extremely good performance, and uses very cleverly selected cryptography algorithms. Unfortunately my pessimistic self thought that this sounds too good to be true. Nowadays I know better and have to take off my hat to Jason A. Donenfeld for a particularly clever piece of software. In all the tests I did so far wireguard kept its promises and worked great. Also other people recognised this and the code has finally been merged into the net-next branch of the linux kernel. It will be available by default with kernel release 5.6.
In the meantime installation is actually also quite simple. The project offers dkms enabled kernel module compilation, prepackaged for almost all distributions and platforms on their project website. Setting it up is relatively easy with the help of the wg-quick script. More details about setting up the crypto keys can be found here: https://www.ckn.io/blog/2017/11/14/wireguard-vpn-typical-setup/.
I didn’t run into any issues when setting up wireguard with the tool itself. Just know that in case of Fedora the iptables rules have to be adapted. Ubuntu afaik does not run a firewall by default on the RPI. Meaning additional iptables changes aren’t necessary.
Dynamic DNS
Since static IP addresses on private internet connections are a rare thing these days, using a dynamic dns resolver is necessary in most cases. I decided to use ddnss.de because it is free and there is an update script available on github: https://github.com/M0ses/ddnss-update. I run this script once an hour using a cron job. The only thing I still had to do was to install some perl dependencies and correctly set the permissions on the log file.
GPIO Permissions
In order to allow non-root users to access the gpios, a small script had to be added to the startup procedure. I created a systemd file in /etc/systemd/system and made it execute the following commands:
chgrp gpio /dev/gpiochip* && chmod g+rw /dev/gpiochip*
Now all users in the group gpio will be able to access them.
The Application Itself
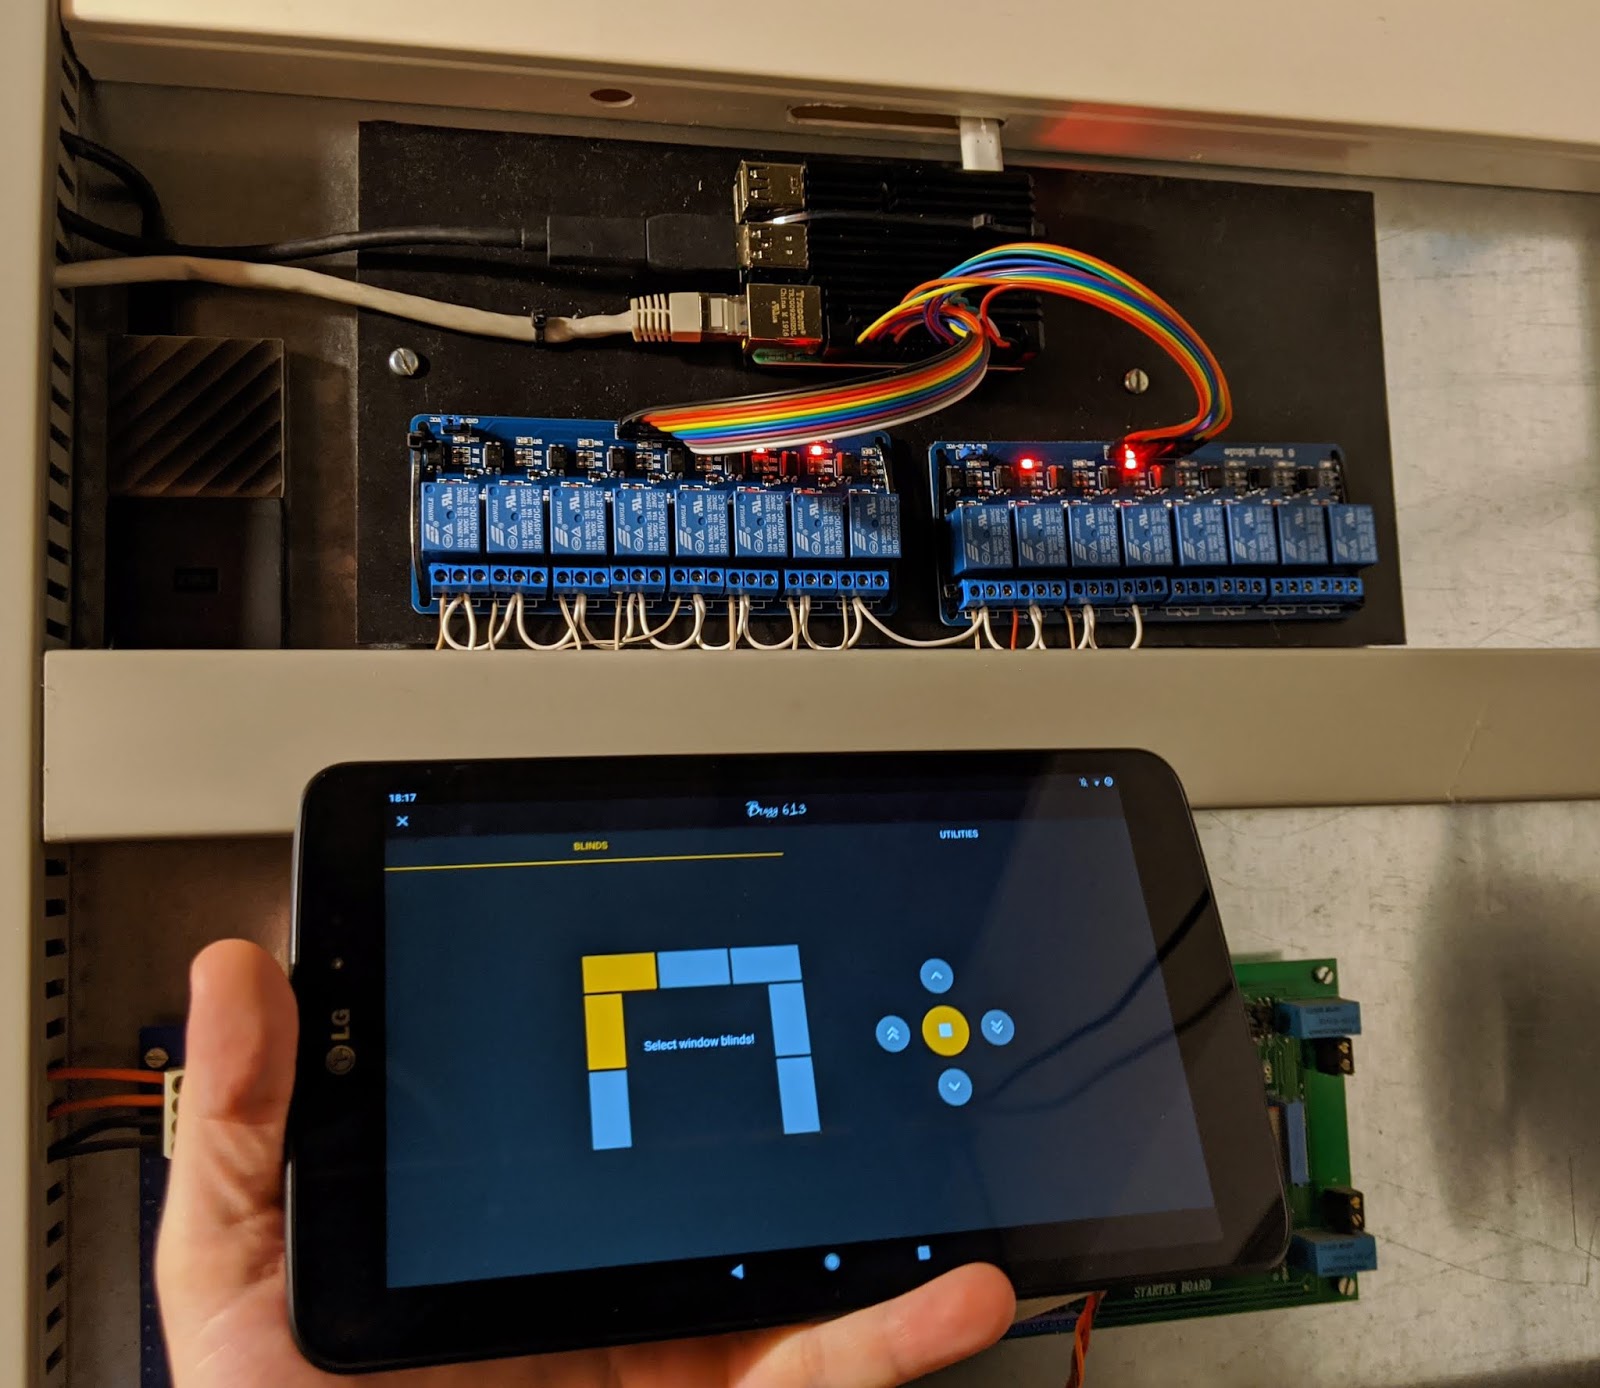
What the system has to control are mostly different kinds of relays. Those relays are then hooked up to control window blinds, the garage door and outdoor lighting. Fortunately on amazon you can get cheap relay boards which do the job very well. We integrated two eight-channel relay boards and one four-channel relay board from a brand called Elegoo. Fortunately most of these relay boards had already been in place and I could focus on the software alone.
I wanted to have something relatively generic, so that adaptions to the setup won’t require updates to the application itself. For this reason I created a config file in which I describe the gpios I want to use, gave them a name and set some additional settings like timeouts. Since not all the functionality is related to the gpios, I also added an option to run external scripts.
{
    "blinds1": { "type": "output", "pin": 32, "gpio": "GPIO12", "line": 12, "timeout": 120 },
    "blinds2": { "type": "output", "pin": 33, "gpio": "GPIO13", "line": 13, "timeout": 120 },
    "blinds3": { "type": "output", "pin": 36, "gpio": "GPIO16", "line": 16, "timeout": 120 },
    "blinds4": { "type": "output", "pin": 11, "gpio": "GPIO17", "line": 17, "timeout": 120 },
    "blinds5": { "type": "output", "pin": 12, "gpio": "GPIO18", "line": 18, "timeout": 120 },
    "blinds6": { "type": "output", "pin": 35, "gpio": "GPIO19", "line": 19, "timeout": 120 },
    "blinds7": { "type": "output", "pin": 38, "gpio": "GPIO20", "line": 20, "timeout": 120 },
    "up":      { "type": "output", "pin": 29, "gpio": "GPIO5", "line": 5, "conflicts": ["down"], "timeout": 0, "resets_timeout_of": ["blinds1", "blinds2", "blinds3", "blinds4", "blinds5", "blinds6", "blinds7"], "notify": false  },
    "down":    { "type": "output", "pin": 31, "gpio": "GPIO6", "line": 6, "conflicts": ["up"], "timeout": 0, "resets_timeout_of": ["blinds1", "blinds2", "blinds3", "blinds4", "blinds5", "blinds6", "blinds7"], "notify": false  },
    "lights":  { "type": "output", "pin": 40, "gpio": "GPIO21", "line": 21, "timeout": 0 },
    "water_feature": { "type": "output", "pin": 15, "gpio": "GPIO22", "line": 22, "timeout": 0 },
    "server_wol": { "type": "script", "path": "/etc/alabama/server_wol.sh" },
    "server_shutdown":{ "type":"script", "path":"/etc/alabama/server_shutdown.sh" },
    "custom1": { "type": "output", "pin": 16, "gpio": "GPIO23", "line": 23, "timeout": 0 },
    "custom2": { "type": "output", "pin": 18, "gpio": "GPIO24", "line": 24, "timeout": 0 },
    "custom3": { "type": "output", "pin": 22, "gpio": "GPIO25", "line": 25, "timeout": 0 },
    "custom4": { "type": "output", "pin": 37, "gpio":  "GPIO26", "line":  26, "timeout":  0},
    "custom5": { "type": "output", "pin": 13, "gpio":  "GPIO27", "line":  27, "timeout":  0},
    "garage_power": { "type": "output", "pin": 16, "gpio": "GPIO2", "line": 2, "timeout": 0 },
    "garage_toggle": { "type": "output", "pin": 18, "gpio": "GPIO3", "line": 3, "timeout": 0 },
    "customGarage1": { "type": "output", "pin": 18, "gpio": "GPIO4", "line": 4, "timeout": 0 },
    "customGarage2": { "type": "output", "pin": 18, "gpio": "GPIO11", "line": 11, "timeout": 0 }
}
To parse the config file I added jsoncpp as it is well supported and also used by other projects like chromium. To access the gpios I switched to libgpiod, since the old sysfs support is disabled in some distributions like Fedora. In the config file you can also see that I included the gpio name and the line number. This is because on distributions like Fedora the device tree file in the kernel has been modified to include the gpio names, whereas on Ubuntu you have to use the line number.
To communicate with the server I wanted to use grpc, as I haven’t had the opportunity to use is so far and wanted to have an idea of how it works compared to other frameworks like thrift.
syntax = "proto3";

message Empty { }

message Identifier {
    string id = 1;
}

message OutputConfiguration {
    string id = 1;
    bool value = 2;
    uint32 timeout = 3;
}

message IdentifierList {
    repeated string id = 1;
}

message Revision {
    uint64 revision = 1;
}

service AutomationService {
    rpc SetOutput(OutputConfiguration) returns (Empty) { }
    rpc GetOutput(Identifier) returns (OutputConfiguration) { }
    rpc RunScript(Identifier) returns (Empty) { }
    rpc GetListOfOutputs(Empty) returns (IdentifierList) { }
    rpc GetListOfScripts(Empty) returns (IdentifierList) { }
    rpc WaitForRevisionChange(Revision) returns (Revision) { }
}
As you can see the protocol is very simple. Originally I wanted to introduce a stream for notifications but realised I most likely have to implement an asynchronous server and the documentation was rather non existent on how to achieve that. Meaning I went with a synchronous server implementation. In order to check for changes I introduced a revision number and a function which blocks for up to one second or returns the updated revision in case of a change. It works out here, but once I have some more time I want to change this to a proper asynchronous implementation and a notification stream.
Part 2: The Client Library
The easiest option, and probably also a time saver would have been to generate the grpc code using protoc and directly implement the client code in the Android application. But I spoke about over-engineering this system in the beginning of the blog post, so here we are. The client code is again implemented in C++ and wrapped into a C library.
#pragma once

extern "C"
{

#include <stdint.h>
#include <stdbool.h>

typedef uint64_t HandleType;

typedef enum
{
    ErrorType_Ok = 0,
    ErrorType_ConnectionDown = 1,
    ErrorType_Timeout = 2,
    ErrorType_InvalidArgument = 3,
    ErrorType_Unknown = 100,
} ErrorType;

HandleType Alabama_Init();
ErrorType Alabama_Connect(HandleType handle, const char* address, uint16_t port);
ErrorType Alabama_Disconnect(HandleType handle);
void Alabama_Release(HandleType handle);

ErrorType Alabama_RunScript(HandleType handle, const char* id);
ErrorType Alabama_GetScriptIds(HandleType handle, uint32_t* count, const char** ids);

ErrorType Alabama_SetOutput(HandleType handle, const char* id, const bool value, const int timeout);
ErrorType Alabama_GetOutput(HandleType handle, const char* id, bool* value, int* timeout);
ErrorType Alabama_GetOutputIds(HandleType handle, uint32_t* count, const char** ids);

typedef void (NotificationCallback_T)(const uint64_t user_data);
ErrorType Alabama_SetOutputNotificationCallback(HandleType handle, NotificationCallback_T* callback, const uint64_t user_data);
ErrorType Alabama_SetConnectionLostCallback(HandleType handle, NotificationCallback_T* callbac, const uint64_t user_data);

}
In case you wondered about the function prefix. The project name I chose is Alabama, due to the song “Sweet Home Alabama”. The only other alternative in my mind at the time was “West Virginia” but this is too much to type as a prefix ;). Back to the C api, this allows for easy testing using ctypes/python3.
import ctypes
import typing

OUTPUT_NOTIFICATION_CALLBACK_T = ctypes.CFUNCTYPE(None, ctypes.c_uint64)
OutputNotificationCallback = OUTPUT_NOTIFICATION_CALLBACK_T(PrintOutputNotification)

class Client:
    def __init__(self, api_path):
        self._api = ctypes.CDLL(api_path)

        self._api.Alabama_Init.argtypes = None
        self._api.Alabama_Init.restype = ctypes.c_uint64

        self._api.Alabama_Connect.argtypes = (ctypes.c_uint64, ctypes.c_char_p, ctypes.c_uint16)
        self._api.Alabama_Connect.restype = ctypes.c_uint32

        self._api.Alabama_SetOutput.argtypes = (ctypes.c_uint64, ctypes.c_char_p, ctypes.c_bool, ctypes.c_int32)
        self._api.Alabama_SetOutput.restype = ctypes.c_uint32

        self._api.Alabama_RunScript.argtypes = (ctypes.c_uint64, ctypes.c_char_p)
        self._api.Alabama_RunScript.restype = ctypes.c_uint32

        self._api.Alabama_SetOutputNotificationCallback.argtypes = (ctypes.c_uint64, OUTPUT_NOTIFICATION_CALLBACK_T, ctypes.c_uint64)
        self._api.Alabama_SetOutputNotificationCallback.restype = ctypes.c_uint32

        self._handle = self._api.Alabama_Init()

        # definition of remaining functions

    def Connect(self, ip : str, port : int):
        status = self._api.Alabama_Connect(self._handle, ip.encode("utf-8"), port)
        if status != 0:
            raise RuntimeError("Connection failed.")

    def SetOutput(self, id: str, value : bool, timeout):
        return self._api.Alabama_SetOutput(self._handle, id.encode("utf-8"), ctypes.c_bool(value), timeout)

    def RunScript(self, name: str):
        return self._api.Alabama_RunScript(self._handle, name.encode("utf-8"))

    # remaining wrapper functions ...
Even C function callbacks are working just fine in python. The only remaining thing to do was compile grpc for all platforms I needed it. Luckily Ubuntu and Fedora have it in their repository already. The only platforms missing were armv7 and arm64 for Android. Fortunately the cmake files for grpc have been updated some time during the last year and compiling it for Android is not a big deal anymore:
# uninstall system protoc/grpc in case of issues first
export ANDROID_NDK=/home/michael/Downloads/android-ndk-r19c-linux-x86_64/android-ndk-r19c
cmake ../\
    -DCMAKE_TOOLCHAIN_FILE=${ANDROID_NDK}/build/cmake/android.toolchain.cmake\
    -DANDROID_ABI=arm64-v8a\
    -DANDROID_PLATFORM=android-26\
    -DANDROID_STL=c++_shared\
    -DRUN_HAVE_STD_REGEX=0\
    -DRUN_HAVE_POSIX_REGEX=0\
    -DRUN_HAVE_STEADY_CLOCK=0\
    -Dprotobuf_BUILD_PROTOC_BINARIES=off\
    -DCMAKE_BUILD_TYPE=Release
cmake --build . --target grpc++
Part 3: The Android-App
The original micro controller based system wasn’t connected to the network and controlled by some switches and a simple led display. When replacing it, fortunately smartphones had already been available and I decided to do a simple mobile app (the screenshot you saw in the beginning of the post). Since at that time the smartphone market was more diverse I had to make it portable. I tried Xamarin, which worked well on Android and looked much more like a native application while not running on iOS and Windows Phone without changes. The decision was easy to go for QML instead, which is also what I used for the new app.
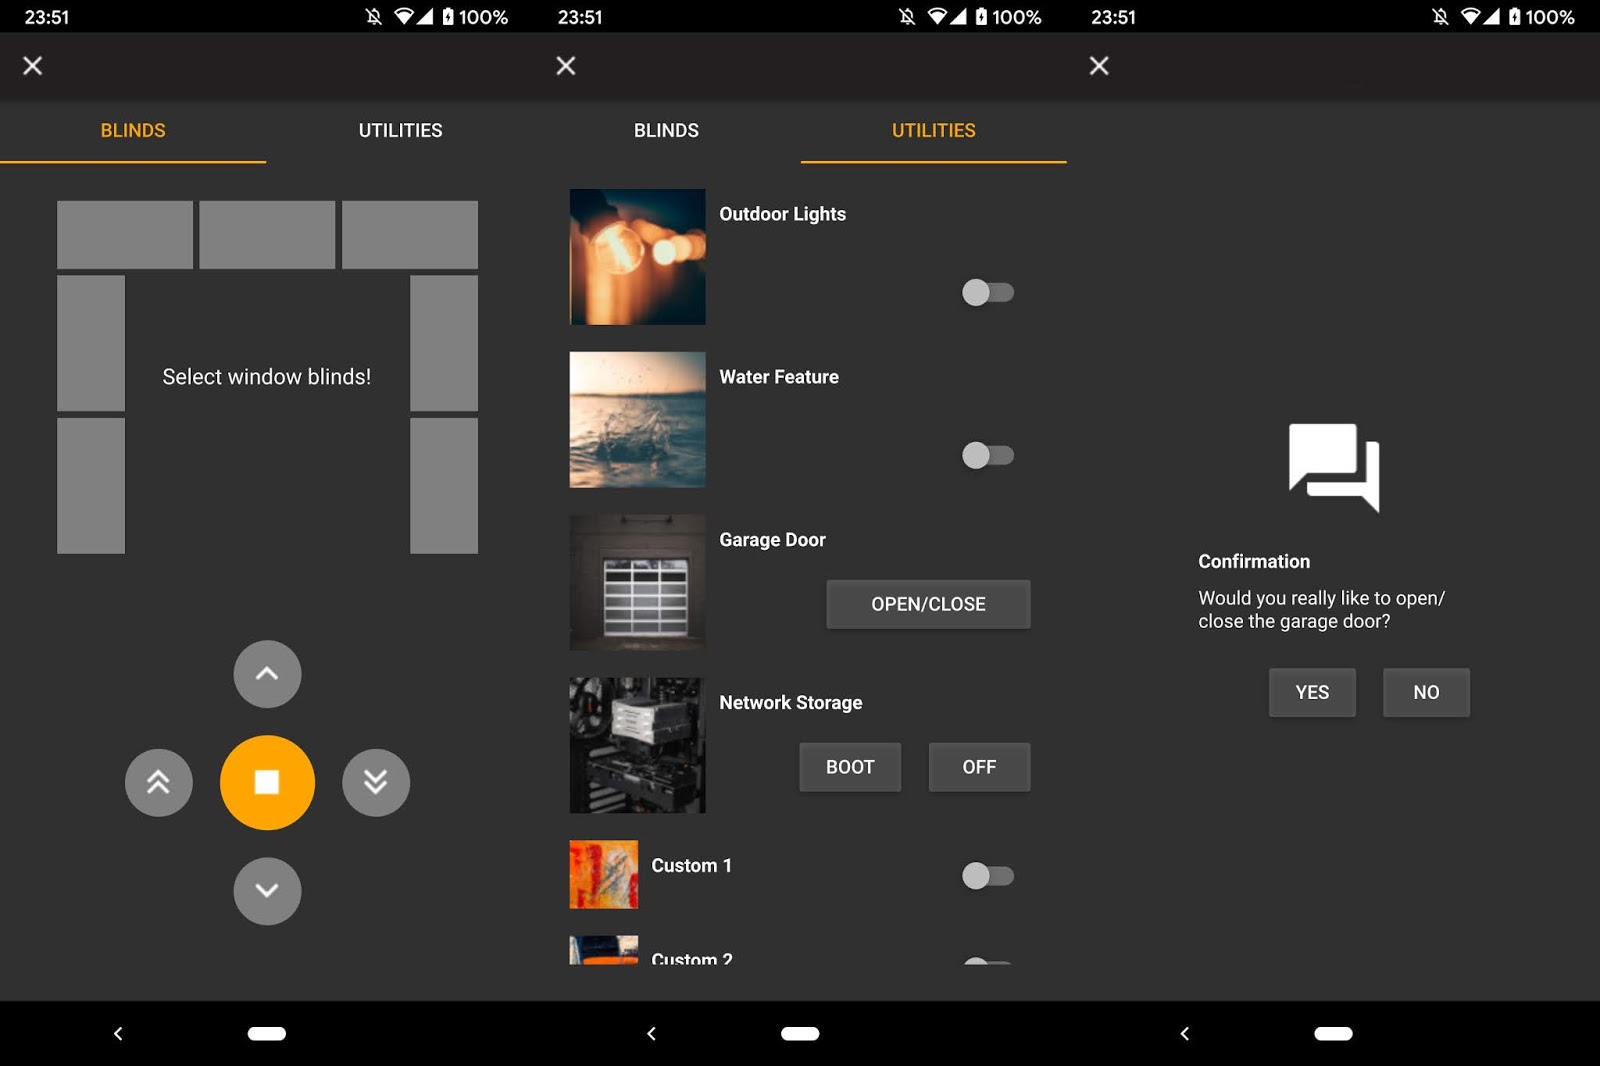
Most of the app consists of the qml code and the wrapper around the C api. The only additional logic is a check whether there is an ip interface up with an ip address that belongs to the wireguard connection. I wanted to ensure that nobody remotely opens the garage door by accident. There currently is no way to remotely check whether it is opened or closed. The ip address information can easily be queried by calling getifaddrs as long as the app is compiled against android-24 or newer.
Part 4: Android-Tablet as permanently installed display
It is also nice to have a display installed in the actual winter garden, since one might not always have the phone in the pocket at home. Of course I thought about the Raspberry PI and the touch display, but honestly that would limit the versatility and is actually rather expensive when you add up the cost for all components. Also most additional features one might want to use, are available as Android apps (e.g. Spotify, Youtube,…). Meaning going for a cheap Android tablet was an easy choice.
I started of with having a look the Amazon Fire 7, which was available for only 35€ during Black Friday. I managed to root it with the help of some posts over on xda-developers. Unfortunately this requires a hardware change: grounding an extremely tiny pin. Since the tablet stopped working after just a week, I must have done something wrong during this week. The tablet simply didn’t boot up anymore.
I then decided to look for a used tablet instead. The Nvidia Shield Tablet looked like it was an option, but I came across another one with better custom rom support: LG G PAD 8.3. It is now running a crDroid build based on Android 9. You can find this tablet used starting at ~50€. Compared to the Fire tablet it has more memory (2GB) and a nicer display (8", 1280x800). Of course if you want something new, you could go for an ad-free version of the Fire 7. I wouldn’t recommend attempting to root it. The risk to damage it is high and the custom rom support isn’t as good. The only somewhat up to date rom is based on LineageOS 14.1.
Conclusion & ToDo’s:
Overall the system has been running for a few weeks and so far no issues have come up. Although there are a few things I still want to do at some point.
- The communication is unencrypted. I still have to generated the certificates and include them in the app.
- I want to have a look at the api to implement the asynchronous server on the backend.
- IPv6 support might be necessary at some point.
- Adding some Video Cameras to the app. I already have a Raspberry PI Zero W and a camera module here…
- Actually automate some things (lights?), so far I only called it home automation, but I’m not actually executing something automatically. Admittedly this should not be a complex task, but I have to come up with a useful case to apply automation.