Raspberry Pi 4 as a Nas: How to Reach the 110 MB/s Read and Write Performance
The perfect NAS imho should be tiny and efficient. Something which is required if one wants to hide it out of sight and to forget about yet another system one has to maintain. If it is also versatile and cheap, I’m definitely not complaining.
Obviously I’m far from the first person trying to come up with a solution for this. Even the first Raspberry PI had been used to build up such setups. I even built a prototype setup myself once based on the first generation Raspberry PI. Although I stopped working on the project quite quickly. The read- and write-performance of 2-3 MB/s made it quite unusable as general network attached storage.
With the Raspberry PI 4 this has finally changed. As the title claims it is possible to achieve 110 MB/s in read and write performance. Although there are quite a few limitations and things one should know about before setting up such a system.
System Configuration My choice of operating system was Ubuntu 20.04 targeting arm64. For performance reasons alone I wanted to use a 64bit distribution, although the version of the RPI I’m using only has 2GiB of memory.
The newest Ubuntu release runs quite well, there are only two changes I made to the base system. One is that I later during my investigations overclocked the chip to 2GHz and I updated the VLI (usb controller) firmware. [Overclocking] doesn’t defer too much from the a setup with raspbian, except for the configuration file which is /boot/firmware/usercfg.txt.
Upgrading the VLI firmware might not be necessary on newer shipped RPIs anymore. Although I definitely recommend checking the current version using the vl805 utility. Older versions had some issues with different usb devices and were lacking thermal management. The update utility and the newest firmware can be found here: github: raspberrypi/rpi-eeprom. At the time of writing this post the newest firmware version is vl805-000137ad.bin.
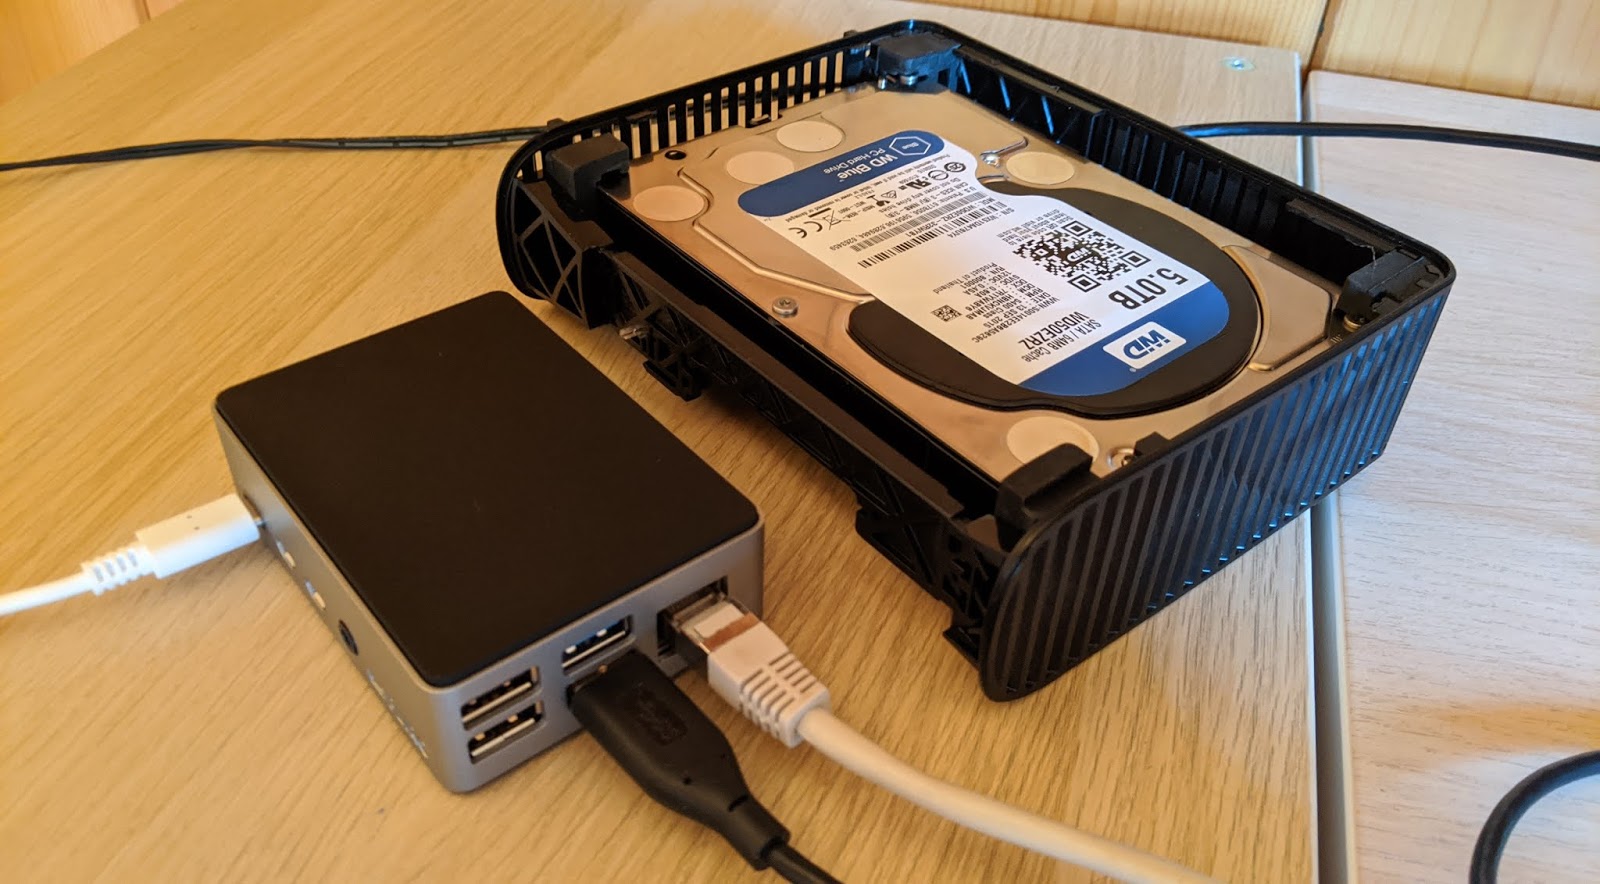
External Storage Device
Initially I was running a set-up with an external Western Digital Elements 5TB. This works fine out of the box as long as you format the disk with a file system supported by the kernel. Keeping it as exfat will mean you have to mount the disk in user space (at least with the current kernel version supporting the RPI). By doing so, a lot of performance is wasted.
Although high capacity and low prices are advantages of those disks, the high spin-up times, noise and the need for a second power supply were not something I wanted in my final set-up. This is why I was in the process of migrating to an external SSD instead. Unfortunately the external case I initially used was based on an outdated JMicron JMS567 usb-sata controller. The controller combined with the raspberry pi had several reliability and performance issues. The reliability issues could be fixed by upgrading to a custom firmware offered on the odroid wiki and enabling the usb-storage.quirks on the kernel boot parameters. Unfortunately the performance was still horrendous in my case. I then upgraded to another case and received an outdated revision which featured the Asmedia 1153 (non-e, sata2, no ssd support) instead of the Asmedia 1351 which it should have shipped with. The controller from the WD Elements disk unfortunately also only supports hard disks. Meaning I didn’t continue with the SSD tests so far.
Network Protocols
What I didn’t realise in the beginning is that the RPI does not feature crypto extensions. Meaning all encryption has to be done in software. This has the disadvantage that encrypted communication obviously isn’t performing that well. I did some simple tests by copying back and forth a few large mkv files and flushing caches. The numbers below are the results of those tests. Take them with a grain of salt, but they should give a rough impression of what’s possible.
    cifs/smb (no encryption, read): 110 MB/s
    cifs/smb (no encryption, write): 110 MB/s
    cifs/smb (aes-128, read): 29 MB/s
    cifs/smb (aes-128, write): 32 MB/s
    nfs (unencrypted, no auth., read):  114 MB/s
    nfs (unencrypted, no auth., write): 109 MB/s
    nfs (tunneled through wireguard, read): 84 MB/s
    nfs (tunneled through wireguard, write): 72 MB/s
    nfs (tunneled through wireguard, read, cpu@2GHz): 86 MB/s
    nfs (tunneled through wireguard, write, cpu@2GHz): 99 MB/s
    sftp (chacha20, read): 55 MB/s
    sftp (aes-256, read): 19 MB/s
The full speed was basically only possible to be reached with unencrypted cifs/smb and nfs. I tried a simple authentication and encryption set-up by tunneling nfs through wireguard. Thanks to the chacha20 stream cipher, this still performs reasonably well, although it is slightly inconvenient to use. In the end I decided to utilise cifs/smb with authentication but no encryption as that is good enough in our private home-network.
Samba Configuration
In the original post I included my samba configuration, but I actually didn’t change too much. It’s only important to add “smb signing = mandatory” to the global section of the configuration. For my personal shares I also added “case sensitive = yes” to the respective sections.
More important is how the share is mounted on the client machine. By default file explorers like nautilus (Gnome Files) mount smb shares in user space which reduces the achievable performance. Fortunately smb (aka cifs) can be mounted in kernel space as well. I added it to my /etc/fstab file:
//<ip>/data /media/data-nas cifs nofail,username=<user>,uid=1000,gid=1000,cache=strict,mapchars,mfsymlinks,vers=3.1.1,cifsacl,password=<pw>,noserverino 0 0
Important are the arguments like mfsymlinks too enable symlink support in a portable and secure way. Caching has to be enabled correctly to achieve the best performance with cache=strict. The version number should be set to 3.0 or newer. Making sure that the linux file permissions and executable bits are stored correctly can be achieved with cifsacl. These settings combined should offer a somewhat linux like experience. The unix extensions known from previous smb verions are not available yet. They have to be reimplemented based on smb 3.0 and are afaik not yet ready.
Full Disk Encryption
Of course doing this in software likely wouldn’t perform very well. When testing the set-up with an SSD (Corsair MX500 2TB) I realized that I could make use of their hardware encryption support. I initially tried to make use of TCG Opal 2.0. Unfortunately the documentation is horrible and the tool (sedutil-cli) has loads of different forks on github. Meaning in the first test I almost destroyed the SSD. Fortunately the SSD from Crucial has a PSID code printed on the back side. Only be aware of that on this specific SSD a firmware update had a bug which caused the change (and therefore loss) of the PSID. The easier option to enable hardware encryption is to use hdparm and the older ATA security standard. Some important notes on that standard are available here and I have also put the commands I used into a python script for interested readers.
Conclusion and Alternatives
It is definitely a possibility to set-up a NAS based on a Raspberry PI. One can also reach to performance to saturate a 1GBit/s Ethernet connection. Unfortunately I can only recommend this when one doesn’t care about encryption and uses off the shelf external disks/SSDS. I for myself have ordered an AsRock DeskMini A300 and will most likely use that x86 based solution instead. The Raspberry PI will then be used for other projects.
For those who would like to utilize an ARM based solution I recommend looking at the RockPI4 with its mini-PCI-e port and the SATA extension. The PinePro64 might also be interesting as it features a regular 4-lane PCI-e slot. Although with all extensions you usually end up paying about as much as for the entry level x86 based systems.